4.28.2011

Designer: Laurel Denise


inspire

I first fell in love with Laurel Denise's sweet jewelry line when I spotted her glass collection at a Hoboken Street fair. Her pieces were simple yet meaningful.  Each small glass shape had just a few words or a saying etched on, but stirred up strong emotions and happy memories. 

create

fairytale "she lived life in her own little fairytale"


She's since moved on to working with metal and leather.

perfect day


"give yourself the perfect day. do what makes you happiest, 
look upon what gives you joy. for all the happiness you give others all year long, 
give yourself the perfect day. unknown."

be

I've recently developed a liking for birds on a wire so naturally I love this one

thinker

And when your having a bad day dont forget to....

smile

4.27.2011

Some Favorites of mine

I haven't had all that much time to make jewelry, but here are some of my most recent necklaces and bracelets.  Updates on earrings coming soon!

Coral and Labradorite Necklace - $95

Multi-Strand Fresh Water Pearl Bracelets - $50

Necklace - $90

Peridot and Amazonite Necklace - $90


4.26.2011

Wired - Intro to Beading Wire

From Fusion Beads

When I first started working with wire, I was totally confused. Gauge? Hardness?  Metal? Round? Half Round? I was clueless with too many options.

So let's clarify some things...

Gauge:

The trick with gauge is to remember the smaller number gauge is thicker than the higher number gauge (i.e. 14 gauge is much thicker than a 28 gauge). 

The type of bead you are working with will determine what gauge wire you need. Some beads are heavier with larger holes; a 20- 22 gauge wire will work perfectly. Most beaders use between 24  and 28 gauge for everyday projects. Small semi-precious gemstone briolettes, for instance, work well with 26 gauge wire. The wire is thin enough to go through even the smallest holes.

For making your own clasps, jump rings, ear wires and components any gauge between 14- 20 will work just fine.

Hardness:

Dead Soft: Soft wire is extremely malleable.  It is great for wire weaving and can be used for wire wrapped very delicate gemstones.  It is not recommended for larger or heavier stones or as connections between stones. Okay to use for a gemstone that is dangling down.

Half Hard:    

Shape

For the most part, round is your best option. It will have the cleanest lines when wire wrapping. Half round or square will give your jewelry a different look but may be harder to wrap.   Most of the time they are useful when working with cabochons.
Half Hard from Fusion Beads
Square from Fusion Beads
 Metal:

 Sterling Silver and Gold-filled metal are the best for a reasonable price.  They will both last for quite some time when cared for properly. Fine Silver and Gold are options too, but VERY expensive.

Tools:

Chain Nose Pliers:
5in Chain Nose Pliers

Also known as needle nose, these pliers have a pointed tip and a textured metal base.  Great  for bending and grasping wire.

Round Nose Pliers:
Round Nose Pliers
These have a rounded, pointed tip that are used for making loops and wire wrapping.

Flat Nose Pliers:

Flat Nose Pliers
Great for holding onto metal wire and making 90 degree angles.

Wire Cutters:

Flush Cutters

There are many different wire cutters out there. I would splurge a little on this one, otherwise the wire you are cutting can actually indent the metal blades.

Oh! I almost forgot...

Soft wire gets kinks and knots very easily.  A nylon jaw plier to straighten the wire works like a charm.
 

4.25.2011

Etsy Artist: Irene Suchocki

All pictures by Irene Suchocki

Don't you just love these photos?

When I found this artist on Etsy, I immediately ordered the pictures above for my San Francisco apartment.  Each photo has simple colors, beautiful lighting and hint of whimsy.

Here are some others that are equally beautiful. 

We Hold the Future

Follow your Bliss

Twinkle

Paris is a Feeling


4.23.2011

Marbleized Easter Eggs

From Epicurious
 Who doesn't love dying Easter eggs? Who loves eating a dozen hard boiled eggs after?? 1 or 2 ok...but 12? That's just asking for a stomach ache.  So make your stomach happy and remove the yolk out of the egg before dying them. This also allows you the keep the dyed egg shells for as long as you like.

I found these instructions from Epicurious that show us an easy way to remove the yolk from an egg: 

*Leave the eggs in the carton while you pierce them. Place the pin point-down against the top of the egg and lightly tap the pin head with the back of the spoon until it pierces the egg. Insert the wooden skewer into the egg and gently press it down until it pierces the bottom of the egg. 

*Remove the egg from the carton, hold it over the glass, and push the skewer up and down through the contents several times to break the yolk. Remove the skewer and place a straw over the hole. Blow through the straw until the contents of the egg are emptied into the glass. Rinse blown eggs in warm water and dry with a paper towel or let them dry in a clean egg carton. 

*Before decorating, gently wash the inside and outside of the empty eggshells with dishwashing detergent and rinse them. If water remains inside a shell, use a straw to blow it out. Let the eggs dry thoroughly on a rack (see tip, below) or in their carton. 


I love the way the eggs shown above were painted. The marbleized effect is fun and mature...perfect for both kids and their parents.

 Here's what you need:
  • Enamel hobby paints: green, lavender, and purple, or colors of your choice
  • Disposable aluminum roasting pans, one for each color combination
  • Rubber gloves
  • Wooden skewers
  • Blown eggs, as many as desired, clean and dry
  • Coffee filters

1. Decide the color or combinations you want to use—you may use one or more colors of paint for each marbling bath. 

2. For each bath, fill a roasting pan with about 4 inches of water. Put on the rubber gloves. Add about 1 teaspoon of each color paint in the chosen combination. Swirl the end of a skewer through the paint. 

3. Place an egg on the end of a skewer. Swirl it around through the paint and water. When the paint has adhered to the egg in a marbled pattern, remove the egg from the skewer to an egg carton and let it dry.

4. Repeat this process for each egg, using the different color marbleizing baths as you wish. 

5. To dispose of paint responsibly, pour each bath slowly through a coffee filter, letting the water drain down the sink and capturing the paint. Throw away the paint. 

Some other designs I love...


From Martha


More Marbleized from Martha


Whats your favorite way to decorate them??

4.18.2011

Anthropologie Inspiration

Anyone who knows me, knows about my love for Anthropologie. I might even go as far as to call it an obsession.

Here are a few of my favorite jewelry pieces that are currently in stores.  The best thing...they can all be recreated at home!

Interrupted Oblique Bangle $168

Under Pressure Hoops $38
Extraterrestrial Hoops $32
Efflorescent Eventide Necklace $128

Point of Sale Hoops $32  


4.16.2011

Paper Rosettes from Paper Source

The Paper Source is a great store for everyone, crafter or not. They make professional invitations, have an endless supply of stamping tools, ribbon, cards, papers and all things crafty.


While decorating for New Years Eve last year, my roommates and I came across these directions for creating paper rosettes.  They are relatively simple to make, inexpensive and make for a beautiful decoration.  


What you need
*8 1/2" x 11" blank paper ( I used computer paper)
*1/4" super tape -- You can find this at paper source. If you cant find one, you can use any double sided tape or a glue specifically made for paper. If using the glue, you must account for extra time to dry.
*1/8" hole punch
*Ribbon for hanging
*Scissors


Instructions
Each Rosette takes 3 sheets of paper to make. 
*Accordion fold each sheet lengthwise at 3/4" intervals.
*Fold in half lengthwise.  Put tape on edge of paper so that when the paper is folded in half the two ends meet, and stick together.  
*Adhere each of the three accordion folded sheets of paper together in this manner so that it forms a circle.
*Punch a hole so that string can be attached.

You can visit Paper Source's site for illustrated pictures and instructions.

We added some glitter to give them a little more sparkle and shine.  Simply water down some glue and paint it onto the edges of the rosette. Then sprinkle the glitter over the rosettes.


We made about 25 in two different sizes and hung them up in our dinning room. It felt like snow flakes falling. We actually didn't take them down until we moved out in October.  I'm pretty sure they would have stayed up even longer!


Where to Start....

There are a few basic tools that I think are especially helpful to have when beginning to make jewelry.

If you want to make a simple beaded necklace or bracelet:


Soft-Flex Wire: This is the best wire I have found to date. It comes in different diameters (.014, .019, .024 which will determine the strength of the wire. The smallest diameters is best used with light weight beads or, even better, pearls. The small diameters are also good for those pesky beads with super tiny holes. The .024 diameter is great for large, heavy duty beads!  I like having all three on hand, but if you want to only invest in one, go with the .019.  Its basic and will get the job done.

Crimp Beads: To secure your beaded wire to a clasp, you need a crimp bead to attach the two. The crimp bead basically allows you to thread your wire through the crimp bead then the clasp then through the crimp bead again. Once the crimp bead is crimped, the clasp is not going anywhere!  The size you buy depends on the wire size you are using.  I found this great chart from Fusionbeads.com

TL0500 Standard Crimping Pliers
Beading Wire Size 0.010" 0.012" 0.013" 0.014" 0.015" 0.018" 0.019" 0.021" 0.024"


2x2mm Crimp Bead
 •
 •
 •
 •
 •
 •
 •
 •
 •
2x3mm Crimp Bead
 •
 •
 •
 •
 •
 •
 •
 •
 •


2x1mm Crimp Bead
 •
 •
 •
 •
 •
 •
 •
 •
 •


1.25mm Crimp Bead
 •
 •
 •
 •
 •
 •
 •
 •
 •
1.5x2mm Crimp Bead
 •
 •
 •
 •
 •
 •
 •
1.5x3mm Crimp Bead
 •
 •
 •
 •
 •
 •
 •

Crimping Pliers: This tool will allow you to actually crimp the crimp bead. Some people like to do it with flat nose or ribbed pliers, but I think the tool is much more secure.

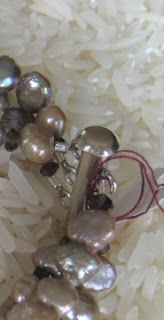
Beads: This is the best part!!!  I buy beads everywhere. You can go to your local craft or bead store or even shop online for your favorite stones. Fire mountain gems is a great place to start. Lima Beads is also great for more unique gemstone options. Etsy is also really a great option.  Personally, I list many beads that I have as left over from previous pieces and even full strands that I haven't touched yet. Buying at Etsy gives you the opportunity to buy in smaller quantities if you are only making jewelry for yourself and don't need full strands of one type of bead.  You can find my shop here.

Crimp Covers: There are crimp covers if you do not like the look of a crimp bead itself. The crimp cover is an open seemed ball that slides over the crimp and is closed completely with the crimp pliers. This will give your piece a professional, clean look.
With Crimp Bead
Without Crimp Beads
Clasp: There are many types of clasps you can choose from and I can cover them all if you are interested. I think lobster clasps are the most secure but love the ease of the toggle.

Closed Jump Rings:  If the clasp you are using does not come with both the clasp and something it to connect to, use a closed jump rind as the "something to connect to".  It is usually the lobster clasps that you'll need the jump ring for.  Make sure they are closed jump rings - the open ones are usually not as secure and you risk the chance they will open while wearing them.

If you are wondering about working with wire and metals, I will cover that soon!

I'd love to know - do you have any other tools you think are helpful for a beginner to have?

4.14.2011

Welcome!

Welcome to Inspire. Design. Create.  I created this blog to share with you inspiration, ideas, instructions or tips on everything creative.

I have always been the crafty type. When I was in Elementary school I got excited over needlepoint Really, needle point?  Remember, I was 10 not 80!  I handmade all my Christmas and Birthday gifts for family (I am sure my dad loved receiving a stuffed bear for Christmas). My Grandmother taught me how to paint in her studio and my mom had an endless supply of crafts in our house to keep me busy.

Jewelry has always been at the center of my creativity. I loved wearing it, but, even more, I loved making it. I would take apart random jewelry I was tired of and reconstructed the pieces into a brand new pair of earrings or a necklace. I taught myself how to work with wire and metal.   Looking online and buying jewelry making magazines were probably my best sources of information and inspiration. 

So expect lots of posts on jewelry with some photography, recipes, fashion and basically all things arts and craftsy sprinkled in.

Enjoy!